Step 1: Find a WordPress Theme
You may be tempted to start combing through the various settings and pages in the WordPress menu, but hold on that for now. The first thing you need to do here is to find a theme for your site.
A WordPress theme is a pre-designed and pre-coded interface template for WordPress. Basically, it saves you the trouble (and money) of having to design your own website from-scratch or to pay someone else to do it for you.
When you log into WordPress for the first time, WordPress will automatically assign their latest theme to your site.
There’s absolutely nothing wrong with using this theme, especially since it’s built by WordPress developers. However, it’s a very basic theme and one that’s not likely going to be useful if you want to do anything more than blog or create a simple site for a local business.

If you want to use a WordPress theme that works better for your niche, don’t be afraid to look around and to find the best and most trustworthy WordPress theme for your purposes.
Keep in mind that every theme requires some configuration. Also, not every theme works the same way. Some utilize a basic text editor (which looks similar to the blank page in Microsoft Word) while others use a page builder or visual editor. So, switching from one theme to another will force you to do a little rework if or when you make a switch. If you want to spare yourself the possible hassle, then don’t move on to the next steps until you’ve found the perfect WordPress theme for your site.
Step 2 : Install Your WordPress Theme
When you find that perfect WordPress theme, it’s time install it in WordPress.
Free WordPress Themes
If you’re using a free theme from the WordPress repository, here is what you need to do:
Inside WordPress, go to the Appearance tab and click on “Themes”.

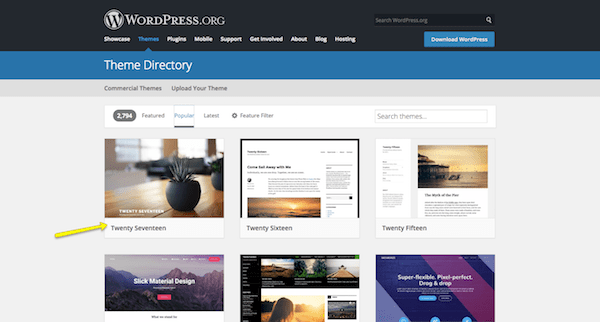
At the top of the page, click on “Add New”. This will take you to the WordPress repository from within WordPress. Use this option so you don’t have to do any manual installation.
Once you’re in the repository, do a search for the WordPress theme you want to use. Hover over it, and click the “Install” button.
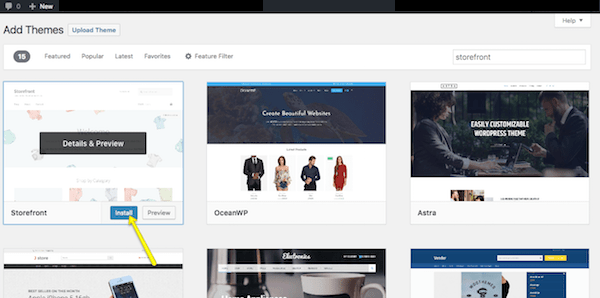
When it’s done installing, you then have to activate it in order to publish it to your WordPress site. Click on “Activate” (in the same spot where the “Install” button was) and wait for it to take you back into the main WordPress dashboard.
Premium WordPress Themes
If you’ve decided to purchase a premium WordPress theme, the process will differ as third-party theme developers and marketplaces don’t sync directly to WordPress. Here is what you need to do:
Go to your WordPress theme’s page and purchase the file. Once you’ve done this, you’ll be taken to a screen where you can download the theme file. It will look something like this:

If there is an option for it, download the “Installable WordPress Files Only”. This will give you a zipped folder you can then upload directly into WordPress.
To do this, go back into WordPress, find the Appearance tab, and go to “Themes”. Click on “Add New” at the top. Only, this time, you’ll select the “Upload Theme” option.
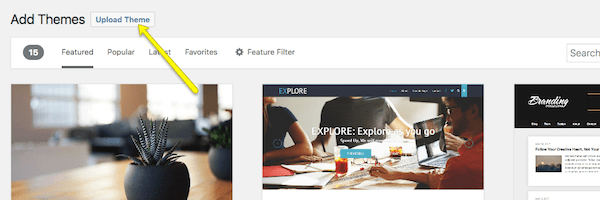
Select the zip file from your computer and click Install Now. With your new theme uploaded into WordPress, you can now activate and publish it to the site.
Step 3: Configure Your WordPress Theme
Upon activation, you’ll want to spend some time configuring your theme. You can do this under the Appearance tab and then click “Customize”.

Ultimately, it’s up to you to decide how much or little of your theme you want to customize. However, you should at least take some time now to go through each of the modules and acquaint yourself with what you have the power to change.

Site Identity is an important one to fill in, so make sure you look at that first.
Colors allows to update your site to your brand’s color palette (if you have one).
Widgets allows you to add content to your footer.
And Menus refers to your site’s navigation–something I’m going to cover in Step 8 so there’s nothing to do here just yet.
Step 4: Publish Your First Pages
There are two types of “pages” you can create for your website:
1. Page

These are traditional web pages that exist within the main navigation of a site. The About page, Contact page, and individual services pages all are made using the Page feature in WordPress.
2. Post

These are blog post “pages” that will only exist within the blog on your website, unless you designate the home page to serve as the blog feed (I’ll talk about that in Step 9).
Now, the great thing about WordPress is that the interface is consistent regardless of whether you’re creating a page or a post. There are different settings you need to apply to each, but the main area in which you work remains the same, which makes it a workspace that’s easy to get used to.

Of course, if you work in a theme that uses a page builder or a visual builder tool to create content, this is going to look a little different.
A page builder tool allows you to create “blocks” of content for your site within WordPress. Once the blocks are in place, you can then populate them with corresponding content.
A visual builder tool works similarly in that it allows you to create blocks of content for your site–however, it does it on the front end of the actual site so you can see your changes in real time. There are plenty of drag and drop page builders out there, but here are some of our favorites.
Regardless of which content creation tool your WordPress theme uses, it’s time to create content for your site.
If you’re running a blog, simply get started writing your first Posts. Once you hit the Publish button, your blogs will go live on the designated Blog page.
For a traditional website, you’ll probably want to build out the following pages:
- Homepage
- About page
- Services or products page(s)
- Contact page
As your website grows, you can create other pages. For now, those will suffice. Get some content on them, publish the pages, and then let’s work on getting them onto your website.
Step 5: Create a Menu
Whereas when you hit the “Publish” button on a Post and it goes straight onto your blog, a Page needs to be added to your site’s navigation (or menu) if you want it to show up.
So, the first thing to do is to create those pages for your site (which you did in Step 7).
Next, you’ll want to go to the Appearance tab and select “Menus”. This is where you will build and manage your site’s navigation.

There is kind of a lot going on here, so let’s take this one step at a time.
First, let’s look at the menu selection dropdown.
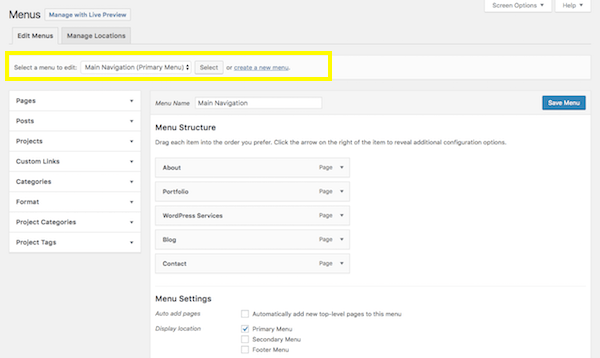
Unless you have a need for a mega menu or multiple menu options on your site, you likely won’t even have a choice here. However, if your theme automatically creates secondary or footer menus for you, be sure to select the one you actually want to create/edit here.
Next, let’s look at the sidebar options.

When you expand these tabs, you’ll be presented with pages, posts, and other types of content that already exist on your site (which is why you need to at least start on Step 7 before doing this step). For the most part, you’ll be working within the Pages tab to create your menus. However, if you do have custom links or other content types you want to add to the navigation, know that this tool allows you to make that happen.
Now, it’s time to create your menu.
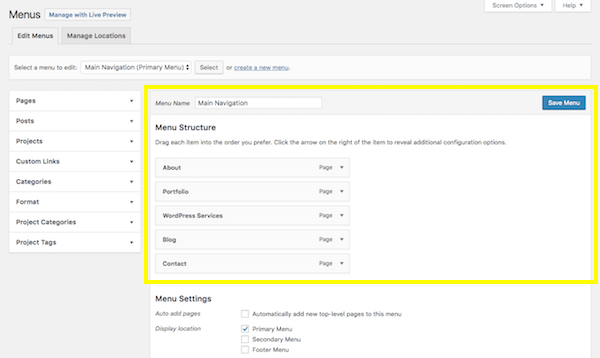
In order to get pages to show up under the Menu Structure section, click the checkbox next to the page (or pages) you want to add to the sidebar. Then click on the “Add to Menu” button. You’ll see those pages then show up under Menu Structure.
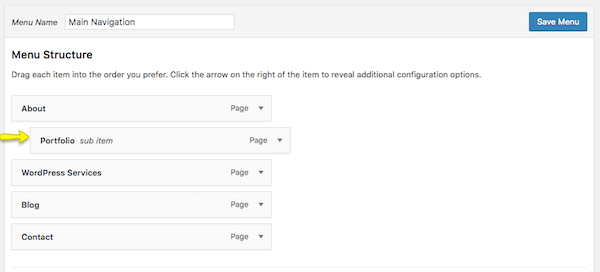
Within this interface, you can now drag-and-drop your pages and design your menu to appear however you’d like it to. In addition to placing pages in a custom order, you can also create a hierarchy. So, let’s say you wanted “Portfolio” to appear only when someone hovers over the About tab, simply drag that page inward so that it becomes a subitem:
You can also change the page labels that appear in the navigation. For instance, let’s say you called the page “Portfolio” in WordPress so your employees would know where to put examples of your work. However, on the customer-facing side of the website, you think it would be clearer if you called the page “Sample Work”. You can rename it here.

One other thing to point out here is the Menu Settings box at the bottom.

If you know that you’ll be adding new pages regularly to your website and don’t want to have to repeat this process every time, you can click on the “Automatically add new top-level pages to this menu” option to streamline your process.
When you’re done setting up your menu, save your changes.